Portrait Painting Course
6 Week Course – Price £195
Dates to be announced Saturdays, 9.30-13.00
Dates to be announced Saturdays, 9.30-13.00

[youtube id=”U08toUV4rQA” width=”600″ height=”350″ autoplay=”no” api_params=”” class=””]

Course Outline
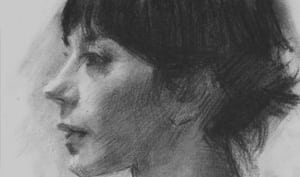
Over the 6 weeks we will be learning how to paint a Grisaille underpainting, below is a short introduction to each step.
Step 1: Construct and Articulation. We begin with a construct, first working out the size and placement of the head on the canvas. Then looking at the proportions of the head, dividing it up into thirds and useing comparative measuring to accurately lock down the features.

Step 2: Silhouette stage. Once we are happy with the line drawing its time to check the positive and negative spaces of the head, remembering that the light and dark masses are just as important as each other and should always work together.

Step 3: Local tones and darkest dark.
The idea is to make an average tone for each element of the portrait to make it easier to judge the tonal relationships in the finishing stages. Always start with the darkest dark to gauge the surrounding tones. Begin with the darkest dark of the hair and t shirt, the face in shadow and finally the background.

Step 4: lightest light, Fall of light and Big Form Modelling.
Begin with the Lightest Light of the forehead using thick impasto white paint, now we have the lightest light and the darkest dark to establish the tonal range of the portrait. Then we need to observe the Fall of Light, the further from the light source the darker the object, observing the gradation of tone between the forehead and neckline. Next its Big Form Modelling, we need to detach ourselves and see things as a simple geometric object, ignoring the details of the model and render the head as though it were a sphere.

Step 5: Variations of the Darks and Rendering the Lights. First start with the Variations of the Darks, after establishing the context for the lights its time to look at the shadows and bring them to a finish. Keeping the tonal range to a minimum so that the viewer’s eye is less drawn to the shadows. Next is Rendering the lights, the aim is to create a sense of structure and divide the head up into planes. Imagine being a sculptor carving out the facets of the face that will be rounded off later.
Learning Outcomes
- Use of dry brush as a sketching implement
- Proportions of the face
- How to prime a canvas
- Wash brushes and maintenance
- Using the brush as a measuring device
- Comparative measurements, transferring the measurements of the face to canvas
- How to analyze shapes, negative and positive, use of tools to help the eye see more objectively
- Use a value strip
- Comparing tonal value
- Mixing paints and use of mediums
- Appropriate use of glaze and impasto to describe the light and shadow of the face
- Brush sizes and different types to be used at the various stages of the painting
Equipment
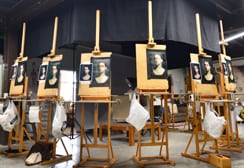
The studio is equipped with easels and work stations to make it more convenient for the students to organise their materials and focus on their work. The studio is also lit with balanced lighting which can save a lot of problems when dealing with a colour palette.
- Image shows the workstation, the Alla Prima painting is for display purpose.

Course Deal = £20
Organisation is a challenge faced by most beginners. The studio is equipped with work stations to ensure everything is at hand. The students will be using the same paints and canvas that the teacher uses for demonstration purposes, eliminating a number of problems that students have when they bring their own paint and canvas.
Each workstation includes:
Easel
Palette
Palette knife
Medium holder
Medium
Thinners
Prepared Canvas
Kitchen roll
Paints (Burnt Umber, Black and White)
(Offer does not include brushes – Information on dedicated suppliers shall be provided)
Registration
Portrait Painting Course= £195
6 Week Course = £195. To register for the portrait painting course, fill in your details and pay a 20% deposit below. Then pay the balance on the day. An email will be sent to confirm your attendance the week before the start date.