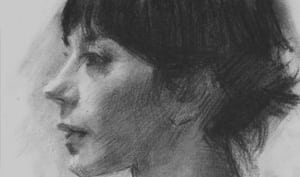
Step 8. Painting the Nose – Portrait of Lisa
Painting the Nose. This stage focuses on refining the form, structure, and colour temperature of the nose by breaking down the larger planes into smaller anatomical divisions. Understanding these subtle forms helps bring realism and dimensionality to the portrait.
- Refine the Planes and Their Anatomical Subdivisions
The nose can be simplified into three major planes—front, side, and bottom—each containing smaller forms that contribute to its overall shape and colour variation:
Front Plane
This is the most forward-facing part of the nose and catches the most light. It can be broken into:
• Nasal bone – The upper third of the nose, often cooler and firmer in structure.
• Bridge – The transition from the nasal bone to the cartilaginous area; still part of the front plane but subtly rounded.
• Furrow – The groove or soft depression that flanks the bridge; may fall into light or shadow depending on the lighting.
• Ball of the nose – The soft, rounded tip of the nose, more fleshy and often warmer in tone, especially in fair or flushed skin.
Side Planes
These slope away from the bridge and are generally darker due to the angle from the light. They contain:
• Maxilla bone – The plane where the nose transitions into the cheek; typically broader and flatter.
• Ball (side portion) – Curves from the front plane into the side; contains more colour and softness.
• Flare of the nostril (alar wing) – Rounded and slightly protruding, this area often picks up warm, reddish tones.
Bottom Plane
Facing downward, this plane is typically in shadow, though it may include subtle reflected light. It includes:
• Nostrils – Appear as soft shadow shapes; avoid outlining them.
• Septum – The central cartilage between the nostrils; sits between the ball and upper lip.
• Underside of the ball – Often the darkest part of the nose, but can pick up ambient light from below.
- Light, Shadow, and Colour
• Pay attention to the direction of the light source when modelling these planes.
• The ball of the nose and nostrils often show higher chroma (warmer reds or pinks) due to thin skin and blood flow.
• The nasal bone and bridge tend to be cooler and lighter, especially where bone is close to the surface.
• Use subtle transitions in tone and temperature to model the form without flattening it. - Edges and Final Accents
• Keep the edges soft, particularly where the side plane blends into the cheek or philtrum.
• Add small accents under the nostrils or at the ball to suggest depth and separation.
• Avoid hard outlines—form should be defined through value relationships and soft edge handling.
This level of anatomical understanding allows for more expressive and accurate rendering, helping the nose sit naturally within the structure of the face.