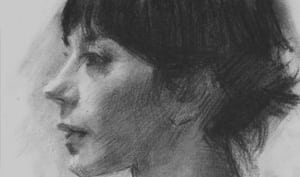
Step 6: Planes of the Face and Features – Portrait of Lisa
Planes of the face and features. To create a strong sense of three-dimensionality, it’s essential to simplify each facial feature into basic planes before refining the details. Dividing the planes of the face in this way provides a structured approach that helps establish light, shadow, and form with greater accuracy.
1. Breaking Features into Planes
Each feature can be visualized as a simplified box-like form with four key planes:
• Front Plane – The most forward-facing surface that catches the most light.
• Side Planes – Turn away from the light, typically appearing darker.
• Top Plane – Faces upward, catching more light from above.
• Bottom Plane – Faces downward, generally the darkest due to limited light exposure.
2. Example: Applying Planes to the Nose
• Front Plane – The bridge of the nose, where light is often strongest.
• Side Planes – The areas flanking the bridge, curving toward the cheeks, which fall into shadow depending on the light source.
• Bottom Plane – The underside of the ball of the nose and the nostrils, typically in deep shadow.
This method applies to all facial features, helping to simplify complex shapes into manageable forms before adding subtle transitions and details.
Using the Asaro Head as a Learning Tool
• The Asaro head (also called the Planes of the Head model) is an excellent reference for understanding these simplified geometric planes.
• Studying this model helps train the eye to see major structural divisions, making it easier to apply these concepts to real faces.
By breaking features into their fundamental planes, you create a solid foundation for accurately rendering light, shadow, and form in portrait painting.